Kelvin White Balance: Demystified
Megan Al-Hassani • June 8, 2015

White balance: It’s something as a photographer you need to get right. Sure, you can make adjustments in post-processing – but why not get it right in camera? Using Kelvin White Balance is pretty simple, and will save you tons of time adjusting your white balance later.

Here’s the gist – short and sweet.


Use this guide as a starting point – Write these down, memorize them, keep a picture of them in your phone. Whatever you can do to keep it handy when shooting – you’ll achieve what you want with Kelvin much faster.


A chart showing the color temperature of light in kelvin

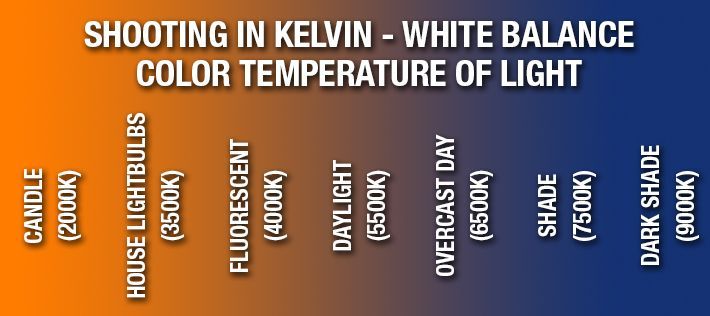
All cameras are different – so your next step is to read your camera manual to determine how to alter your Kelvin White Balance to the above temperatures. Once you dial in your starting point, you’ll want to take a test shot to determine what, if any, adjustments you may need to make.


If your test shot looks too blue, or cool, you’ll need to adjust your Kelvin up. If your test image looks too orange, or warm, you’ll want to adjust the Kelvin down.


That’s all, folks! Now start playing around with Kelvin and you’ll see how much more creative control you can have with your work. The best part about being a photographer is that you control your own work – and using Kelvin White Balance will alllow you so much more creative control.


Share with us your images using Kelvin White Balance in the comments below!

Recent posts

client communication
By Maria Eveslage April 14, 2026
Client communication improves when emails and questionnaires are consistent. Learn how client communication inside Iris Works saves time and reduces confusion.
client expectations
By Maria Eveslage April 13, 2026
Client expectations shape the entire photography experience. Learn how setting client expectations early prevents stress and misunderstandings.
Show More